Mays' newsletter hit my inbox today from Doy bags.
If you don't know what Doy is then you are in for a treat!
http://www.doybags.com/index.html
They are a co-operative based in the Philippines and use recycled juice cartons and other items that would just be thrown away and turn them into desirable bags, belts, picture frames and more.
I initially found them after a bellydancing friend had a fantastic orange juice bag. I loved it so much i asked her where she got it and i then went online and bought my own bag in a different style but in red apple.
SO please check it out!
Friday, 22 May 2009
Monday, 18 May 2009
Yayness
YAY my first items have now been listed on Etsy!
Just a couple of things to start with though, the clothing and other stuff will be coming later on.
For some reason it takes me ages to list items, maybe because i'm not used to it yet.
Ready to list are:
Pale blue gingham bar apron
a set of zakka owls
2 pairs of mini kokeshi
Just a couple of things to start with though, the clothing and other stuff will be coming later on.
For some reason it takes me ages to list items, maybe because i'm not used to it yet.
Ready to list are:
Pale blue gingham bar apron
a set of zakka owls
2 pairs of mini kokeshi
Monday, 11 May 2009


Wednesday, 6 May 2009
I was about to upload the pictures to the owl making tutorial and i remembered that i had seen another tutorial on Moonstitches Blog.
Moonstitches has done a better job than i ever could, so check it out here:
http://moonstitches.typepad.com/photos/tutowlrial/index.html
Moonstitches has done a better job than i ever could, so check it out here:
http://moonstitches.typepad.com/photos/tutowlrial/index.html
Monday, 27 April 2009
paper kokeshi

paper kokeshi
Originally uploaded by tigerluxe
I saw this on flickr while looking for designs to paint on some kokeshi and thought it was a lovely cross between a kokeshi and the washi no ningyo that i made a while ago from a japanese book.
It shouldn't be too difficult to make a cross between the two with the tecniques.
Saturday, 25 April 2009
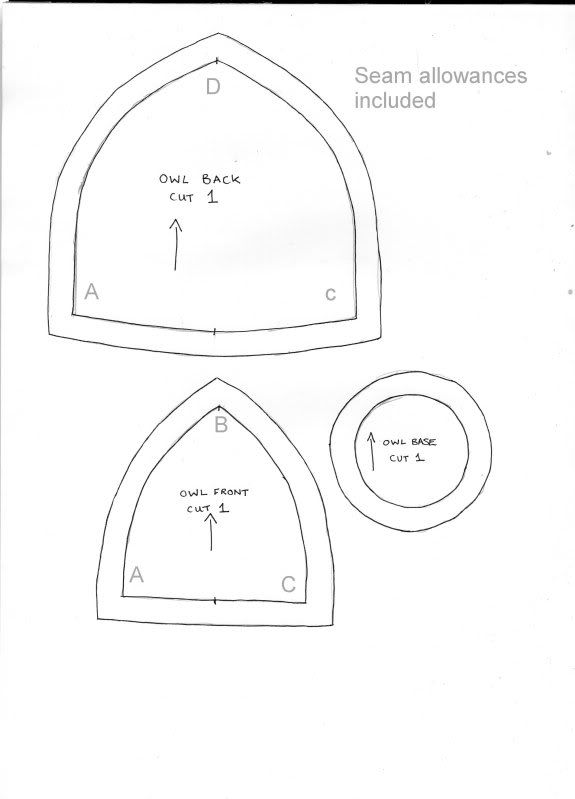
Zakka Owls
I looked everywhere for a book mentioned in someone elses blog and couldn't get hold of one. So i decided to try making my own from the descriptions floating around the internet and some pictures as no one else seems to have posted any to try.
I'll upload in process photos tomorrow.
Photobucket pattern pieces scanned in at full size on a4 paper.
http://i95.photobucket.com/albums/l132/maggotgroves/owlpattern.jpg
You will need scraps of fabric for the tummies, outsides and base.
A bit of embroidery floss for a beak.
Two buttons for eyes.
Stuffing!!!
Cut one of each pattern piece out of contrasting fabric. Here i have used some navy wool scraps and some white synthetic felt.
Sew one side from a to b then pin the other side and sew from c to b.
Next sew up to the point from b to d, making sure that the stitching is strong if handsewing or go and oversew if using the machine.
Trim the seam allowances on the curves and close to the point d.
Turn the right way out, rolling the seams between your fingers to smooth out and make the point beak like...
Fold over the point gently and put a pin in place to make a rough face shape. Embroider 3 stitches for a beak and fasten off inside.
Draw around a 2p piece out of thick card and a circle of fabric with a 1 cm seam allowance for the base. This can be the main owl color or the contrast. gather the disc of fabric around the base and fasten off tightly.
Stuff the owl as firmly as you like and with a running stitch gather up the base to make a puffy little body.
Sew on the base with tiny stitches placing it centrally and holding it in place all the way round. Fasten off and put the needle through the body of the owl and snip to leave the end inside the body.
Sew on Buttons for eyes and then you're done!!!
Now make 2 more for a small line of your own little zakka owls.
Marvel at your handywork :D
Friday, 24 April 2009
Recycling is easy for everyone.
I'm always on the look out on cheap ways to save money and recycle.
On an Etsy newsletter today it had a link to this blog:
http://transcanadaetsyteam.blogspot.com/2009/04/earth-day-preview-eco-friendly-products.html
Fantastic ideas to be green that couldn't be easier!
Now if only i could find a supplier for Eco-fi felt and recycled bubble wrap in the uk...
On an Etsy newsletter today it had a link to this blog:
http://transcanadaetsyteam.blogspot.com/2009/04/earth-day-preview-eco-friendly-products.html
Fantastic ideas to be green that couldn't be easier!
Now if only i could find a supplier for Eco-fi felt and recycled bubble wrap in the uk...
Tuesday, 21 April 2009
I'm working on transcribing an edwardian sewing book and a 1940's one and it's a little hard going so bear with me for those projects.
Also to come shortly are some small zakka projects that can be done by hand sewing, like pin cushions and other things.
There HAS to be some way to combine the two....*thinks*
Also to come shortly are some small zakka projects that can be done by hand sewing, like pin cushions and other things.
There HAS to be some way to combine the two....*thinks*
Saturday, 18 April 2009
Vintage Knitting
The first crafty post!!!!
YAY!
If anyone would like to make this and send me pictures then i'll post them up here.
Vintage 1940's Knitted Fez hat
This is a direct transcription so all terms are in 1940's weights and measures and needle size for the UK.
Materials:
2 oz 4 ply wool
1oz 2 ply wool for the scarf to trim
No.9 needles with points at both ends
Tension:
with double wool 5 1/2 stitches to 1"
Method
The fez is worked in double 4 ply wool, the scarf in 2 ply.
The Scarf:
Using the single 2 ply wool and 2 no.9 needles cast on 48 stitches.
1st row- *knit one, make one, knit 2 together; repeat from * to end
repeat this row until work measures 36 inches or length required. Cast off.
The Fez:
Using the double 4 ply wool and 4 no.9 needles, cast on 108 stitches. 36 stitches on each of 3 needles, work in rounds thus:-
1st round- * knit 2, purl 1; repeat from * to end.
2nd round- as the first round
3rd round- * purl 1, knit 1; repeat from * to end.
4th round- as third round
these 4 rounds form the pattern. continue in the pattern until 11th round has been completed.
12th round- * purl 3 together, pattern 33; repeat from * to end.
Continue in pattern for 7 more rounds.
20th round- * purl 3 together, pattern 31; repeat from * to end.
Continue in pattern for 7 more rounds.
Continue in this way Dec 2 stitches on each needle on every 8th round, until 78 stitches remain. Continue without shaping until work measures 6 inches. cast off.
Make up:
Turn the top edge of the fez onto the wrong side, making it deep enough to suit the wearer, and stitch lightly in position. Stitch one edge of the scarf along the lower edge of the fez for a few inches.
Then make a vertical loop about 1 1/2" long with buttonhole stitch or crochet chain, at the lower edge of the fez on the opposite side. Pass the 2 ends of the scarf through this loop, twist round in the opposite direction and tuck in.
Subscribe to:
Posts (Atom)