wow what a long title, anyway a last minute idea for some home made and hand made tokens very much in a handcrafted/victorian/steampunk sense.
you will need:
scraps of fabric (christmassy, nautral linen, gingham etc)
needle and thread
template shapes or biscuit (coookie) cutters
scraps of lace (optional)
ribbon
remnants of stuffing or more fabric scraps.
some whole spices such as cloves and cinnamon
1. get your template or cutter and draw around the shape for example a star in pencil on the back of your fabric.
2. cut the shapes out with a little seam allowance. put 2 of the same shapes with right sides of the fabric together and sew around the edge leaving at least a 1" gap for turning. trim all the corners for neat points and curves.
3. turn inside out. stuff with scraps or toy stuffing loosely and add the whole spices (or a cotton wool puff with essential oils dropped onto).
4. fold a 3" length of ribbon in half and as you sew the gap in your stuffed shape, sew in the ribbon for hanging. (this part could also be done beforehand by more experienced sewers)
options:
hearts in natural linen with a scrap of lace overlaid make a more zakka/country style, as does ginham, stars in sparkly fabric for a more christmassy feel, felt snowmen etc etc
these are really easy to do and a small group of these as a last minute gift or for an unexpected guest will be a welcome token.
FELIZ NAVIDAD, FROHE WIENACHTEN, JOYEUX NOEL, GOD JUL, MERRY CHRISTMAS, HAPPY WINTER SOLSTICE.
have a peaceful and happy end to the year.
Showing posts with label hand sewing. Show all posts
Showing posts with label hand sewing. Show all posts
Wednesday, 22 December 2010
Saturday, 25 April 2009
Zakka Owls
I looked everywhere for a book mentioned in someone elses blog and couldn't get hold of one. So i decided to try making my own from the descriptions floating around the internet and some pictures as no one else seems to have posted any to try.
I'll upload in process photos tomorrow.
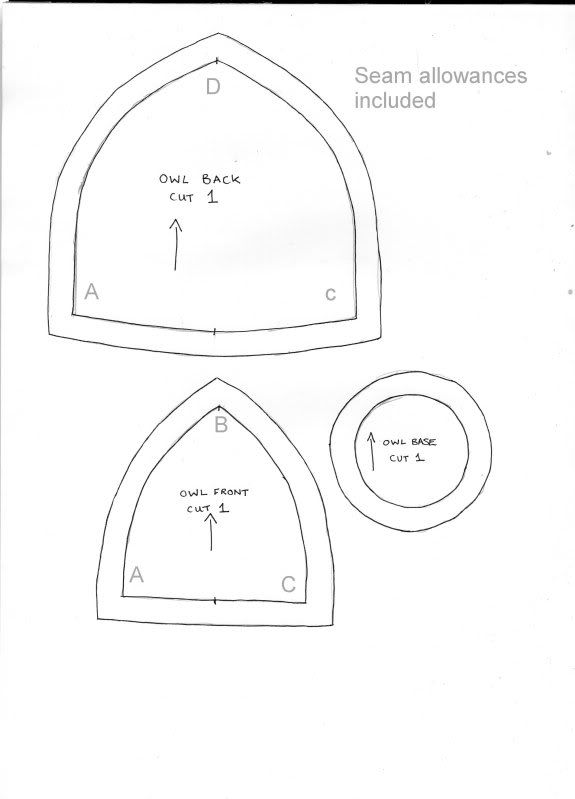
Photobucket pattern pieces scanned in at full size on a4 paper.
http://i95.photobucket.com/albums/l132/maggotgroves/owlpattern.jpg
You will need scraps of fabric for the tummies, outsides and base.
A bit of embroidery floss for a beak.
Two buttons for eyes.
Stuffing!!!
Cut one of each pattern piece out of contrasting fabric. Here i have used some navy wool scraps and some white synthetic felt.
Sew one side from a to b then pin the other side and sew from c to b.
Next sew up to the point from b to d, making sure that the stitching is strong if handsewing or go and oversew if using the machine.
Trim the seam allowances on the curves and close to the point d.
Turn the right way out, rolling the seams between your fingers to smooth out and make the point beak like...
Fold over the point gently and put a pin in place to make a rough face shape. Embroider 3 stitches for a beak and fasten off inside.
Draw around a 2p piece out of thick card and a circle of fabric with a 1 cm seam allowance for the base. This can be the main owl color or the contrast. gather the disc of fabric around the base and fasten off tightly.
Stuff the owl as firmly as you like and with a running stitch gather up the base to make a puffy little body.
Sew on the base with tiny stitches placing it centrally and holding it in place all the way round. Fasten off and put the needle through the body of the owl and snip to leave the end inside the body.
Sew on Buttons for eyes and then you're done!!!
Now make 2 more for a small line of your own little zakka owls.
Marvel at your handywork :D
I'll upload in process photos tomorrow.
Photobucket pattern pieces scanned in at full size on a4 paper.
http://i95.photobucket.com/albums/l132/maggotgroves/owlpattern.jpg
You will need scraps of fabric for the tummies, outsides and base.
A bit of embroidery floss for a beak.
Two buttons for eyes.
Stuffing!!!
Cut one of each pattern piece out of contrasting fabric. Here i have used some navy wool scraps and some white synthetic felt.
Sew one side from a to b then pin the other side and sew from c to b.
Next sew up to the point from b to d, making sure that the stitching is strong if handsewing or go and oversew if using the machine.
Trim the seam allowances on the curves and close to the point d.
Turn the right way out, rolling the seams between your fingers to smooth out and make the point beak like...
Fold over the point gently and put a pin in place to make a rough face shape. Embroider 3 stitches for a beak and fasten off inside.
Draw around a 2p piece out of thick card and a circle of fabric with a 1 cm seam allowance for the base. This can be the main owl color or the contrast. gather the disc of fabric around the base and fasten off tightly.
Stuff the owl as firmly as you like and with a running stitch gather up the base to make a puffy little body.
Sew on the base with tiny stitches placing it centrally and holding it in place all the way round. Fasten off and put the needle through the body of the owl and snip to leave the end inside the body.
Sew on Buttons for eyes and then you're done!!!
Now make 2 more for a small line of your own little zakka owls.
Marvel at your handywork :D
Subscribe to:
Posts (Atom)