Historic perfume terms and ingredient names
Part the first.
Getting the scent out of the organic material.
Some of the chemical compounds in the organic material can be destroyed by the heat of steam distillation and so it is instead extracted by the use of a solvent. The commercial chemicals usually used are derived from petrochemicals and have low toxicity or ethyl alcohol. Other parts of the organic matter are also removed, most notably oil,wax and pigments. what is left is usually called the CONCRETE
The ethyl alcohol is also used a second time to remove more of the unneeded material and what is left is called the ABSOLUTE
Distillation is a very common technique to remove the active scent compounds from most organic material.Steam or dry distillation may be used.Distilled products, whether through steam or dry distillation are known either as ESSENTIAL OILS or OTTOS/ATTARs
Water condensed from the steam process of distillation still contails a trace amount of the fragrant material and is correctly called a HYDROSOL. Examples of this are the obvious ones like Rose water, Lavender water and Orange Blossom water.
Only organic material high in oils is extracted by Expression. The citrus family are an example of this along with others. This was the process most commonly used before the spread of distillation.
Enfleurage is the last method used to extract the scent compounds from organic matter. It is a two stage process for compounds that would be destroyed by heat. The material is mixed with wax or fat or a combination of both. Next the mixture is 'washed' with alcohol to extract the volatile oils. This is hardly used in later times as it is a longer and costlier process.
NOTE:Confusingly some preparations use the term 'water' but actually contain alcohol- Toilet Water. To tell the difference look at the ingredients and see if it contains alcohol. If it doesn't then it is a true plant water, if it does, then it is an Eau de Toilette.
Monday, 14 February 2011

Thursday, 3 February 2011
Grapics Fairy is amazing
This wonderful background to the blog is from The Grapics Fairy, you can find her here:
http://www.graphicsfairy.blogspot.com
She has an amazing array of vintage and antique images and clipart for FREE, yes you heard it, FREE!
Anyone into victorian/steampunk/vintage/shabby chic will be spoilt for choice.
On another note, more information on creating perfumes coming up.
http://www.graphicsfairy.blogspot.com
She has an amazing array of vintage and antique images and clipart for FREE, yes you heard it, FREE!
Anyone into victorian/steampunk/vintage/shabby chic will be spoilt for choice.
On another note, more information on creating perfumes coming up.
Monday, 24 January 2011
Free face mask recipe
Yes indeedy, a free recipe, that is not only easy, but safe to do.
Ingredients:
1 tblsp Powdered gelatine
1 tblsp Milk (mine is skimmed, but you can use any sort, even oat)
Microwaveable container (mine is 950w)
Warm your milk up for a few seconds to take the chill off. Sprinkle in the gelatine slowly and stir really well. Microwave for about 10-15 seconds and stir again. It should look like a thick paste by this point. If it doesn't, don't despair, just let it cool a little and keep stirring.
Use an old foundation brush or similar to spread the cooling mask onto your face. Please make sure it's still not hot first! Peel gently off or wash off with warm water, your skin will feel great.
Dry and older skin types can add chopped fresh rose petals or honey to the milk before adding the gelatine
Oily skins can leave it as it is or add in some lemon juice
have fun and be safe with this.
Ingredients:
1 tblsp Powdered gelatine
1 tblsp Milk (mine is skimmed, but you can use any sort, even oat)
Microwaveable container (mine is 950w)
Warm your milk up for a few seconds to take the chill off. Sprinkle in the gelatine slowly and stir really well. Microwave for about 10-15 seconds and stir again. It should look like a thick paste by this point. If it doesn't, don't despair, just let it cool a little and keep stirring.
Use an old foundation brush or similar to spread the cooling mask onto your face. Please make sure it's still not hot first! Peel gently off or wash off with warm water, your skin will feel great.
Dry and older skin types can add chopped fresh rose petals or honey to the milk before adding the gelatine
Oily skins can leave it as it is or add in some lemon juice
have fun and be safe with this.
Wednesday, 29 December 2010
perfume scents
I've been working on and off on more perfume blends.
Using original recipes from victorian pharmacy books i have recreated some real historical perfumes.
I have learned so much from those old books including how to blend and preserve certain types of scent, it has been fascinating learning all about perfumes.
One suprising fact is that commercial blended perfumes contain upwards of 250 synthetic chemicals. How bad can that be for your health?
At least going back to the old formulas and using essential oils, the perfumes i make are safer all round as i'm also using safe dilutions for the skin. Commercial perfumes especially parfum strength are actually stronger then aromatherapy dosage.
Only where i can't get a specific smell will i use synthetic alternatives. Not only are many of the animal related products expensive they can be unethical or unsuitable for vegetarians. So to cater to many tastes i prefer to go synthetic for those chemicals like civet, ambergris and musk.
Blending is a more complicated affair, with personal taste and chemical balance coming into consideration.
I seem to have a very sensitive nose and i get headaches if i smell the concentrated oils too much and my nose gets drowned fast. By that i mean that past a certain point i literally know i'm smelling something but it all smells the same. It's different for every person but eventually would happen to most people.
Plastic is a no-no, it absorbs the molecules of scent not as much as skin would but to a similar effect, so keeping everything clean is a must and getting glass beakers and stirring rods is essential for mixing.
Hope those notes have been helpful for anyone interested
ciao for now
Using original recipes from victorian pharmacy books i have recreated some real historical perfumes.
I have learned so much from those old books including how to blend and preserve certain types of scent, it has been fascinating learning all about perfumes.
One suprising fact is that commercial blended perfumes contain upwards of 250 synthetic chemicals. How bad can that be for your health?
At least going back to the old formulas and using essential oils, the perfumes i make are safer all round as i'm also using safe dilutions for the skin. Commercial perfumes especially parfum strength are actually stronger then aromatherapy dosage.
Only where i can't get a specific smell will i use synthetic alternatives. Not only are many of the animal related products expensive they can be unethical or unsuitable for vegetarians. So to cater to many tastes i prefer to go synthetic for those chemicals like civet, ambergris and musk.
Blending is a more complicated affair, with personal taste and chemical balance coming into consideration.
I seem to have a very sensitive nose and i get headaches if i smell the concentrated oils too much and my nose gets drowned fast. By that i mean that past a certain point i literally know i'm smelling something but it all smells the same. It's different for every person but eventually would happen to most people.
Plastic is a no-no, it absorbs the molecules of scent not as much as skin would but to a similar effect, so keeping everything clean is a must and getting glass beakers and stirring rods is essential for mixing.
Hope those notes have been helpful for anyone interested
ciao for now
Wednesday, 22 December 2010
quick and easy last minute christmas decoration gifts
wow what a long title, anyway a last minute idea for some home made and hand made tokens very much in a handcrafted/victorian/steampunk sense.
you will need:
scraps of fabric (christmassy, nautral linen, gingham etc)
needle and thread
template shapes or biscuit (coookie) cutters
scraps of lace (optional)
ribbon
remnants of stuffing or more fabric scraps.
some whole spices such as cloves and cinnamon
1. get your template or cutter and draw around the shape for example a star in pencil on the back of your fabric.
2. cut the shapes out with a little seam allowance. put 2 of the same shapes with right sides of the fabric together and sew around the edge leaving at least a 1" gap for turning. trim all the corners for neat points and curves.
3. turn inside out. stuff with scraps or toy stuffing loosely and add the whole spices (or a cotton wool puff with essential oils dropped onto).
4. fold a 3" length of ribbon in half and as you sew the gap in your stuffed shape, sew in the ribbon for hanging. (this part could also be done beforehand by more experienced sewers)
options:
hearts in natural linen with a scrap of lace overlaid make a more zakka/country style, as does ginham, stars in sparkly fabric for a more christmassy feel, felt snowmen etc etc
these are really easy to do and a small group of these as a last minute gift or for an unexpected guest will be a welcome token.
FELIZ NAVIDAD, FROHE WIENACHTEN, JOYEUX NOEL, GOD JUL, MERRY CHRISTMAS, HAPPY WINTER SOLSTICE.
have a peaceful and happy end to the year.
you will need:
scraps of fabric (christmassy, nautral linen, gingham etc)
needle and thread
template shapes or biscuit (coookie) cutters
scraps of lace (optional)
ribbon
remnants of stuffing or more fabric scraps.
some whole spices such as cloves and cinnamon
1. get your template or cutter and draw around the shape for example a star in pencil on the back of your fabric.
2. cut the shapes out with a little seam allowance. put 2 of the same shapes with right sides of the fabric together and sew around the edge leaving at least a 1" gap for turning. trim all the corners for neat points and curves.
3. turn inside out. stuff with scraps or toy stuffing loosely and add the whole spices (or a cotton wool puff with essential oils dropped onto).
4. fold a 3" length of ribbon in half and as you sew the gap in your stuffed shape, sew in the ribbon for hanging. (this part could also be done beforehand by more experienced sewers)
options:
hearts in natural linen with a scrap of lace overlaid make a more zakka/country style, as does ginham, stars in sparkly fabric for a more christmassy feel, felt snowmen etc etc
these are really easy to do and a small group of these as a last minute gift or for an unexpected guest will be a welcome token.
FELIZ NAVIDAD, FROHE WIENACHTEN, JOYEUX NOEL, GOD JUL, MERRY CHRISTMAS, HAPPY WINTER SOLSTICE.
have a peaceful and happy end to the year.
Tuesday, 7 December 2010
Making my bjd is still going on. Slowly, but still going. After reading posts on The Joint forum it does make me wonder about people you know.
First, they think that the forum (and every other of its' kind) is there to tell them step by step actually how to sculpt, materials etc, then second, they think that it is cheaper to make a bjd than it is to buy one!
What can i say...it's a very personal process and no-one can teach you how to sculpt, joint, mold, cast etc. Every maker has a different process, every country has different products available. It's all down to research. But then nowadays everyone seems to think that you don't have to read and search for information, it should all be provided for you with buckets of people to hold your hand and tell you exactly what you want to hear. As to the cost...it costs a hell of a lot more to get to the stage where you have a decent looking bjd than it does to buy the things.
It also takes dedication over a lot of time and of course motivation. From a complete novice stage to getting a head that looks like a head and not some alien it took me 2 years. It has taken me another year and a half to learn about resin and moldmaking. I actually think that is pretty good for someone who never learned how to sculpt before and also had energy limitations.
I still have a lot of work to do to get a master decent enough to send away for casting but i think i have actually achieved something for myself getting this far.
First, they think that the forum (and every other of its' kind) is there to tell them step by step actually how to sculpt, materials etc, then second, they think that it is cheaper to make a bjd than it is to buy one!
What can i say...it's a very personal process and no-one can teach you how to sculpt, joint, mold, cast etc. Every maker has a different process, every country has different products available. It's all down to research. But then nowadays everyone seems to think that you don't have to read and search for information, it should all be provided for you with buckets of people to hold your hand and tell you exactly what you want to hear. As to the cost...it costs a hell of a lot more to get to the stage where you have a decent looking bjd than it does to buy the things.
It also takes dedication over a lot of time and of course motivation. From a complete novice stage to getting a head that looks like a head and not some alien it took me 2 years. It has taken me another year and a half to learn about resin and moldmaking. I actually think that is pretty good for someone who never learned how to sculpt before and also had energy limitations.
I still have a lot of work to do to get a master decent enough to send away for casting but i think i have actually achieved something for myself getting this far.

Tuesday, 30 November 2010
wow, with many computer crashes and problems of health i actually LOST this account!!!
Anyway i have things planned and need to sort out some more japanese inspired projects and patterns for free.
I've also got back into Steampunk and have even started making Steampunk USB 8GB flash dives. I will post up some pictures soon as i'm going to be starting work on them soon.
I have also in the time gone by been sculpting, mould making and casting a small BJD and i'm very close to getting the point where i have a master that i'm going to send away to be cast.
I found a very interesting article through the Brass Goggles forum about precious metal clay and actually making the stuff. With a small amount of brass powder i have sitting around it is very tempting.
Anyway i have things planned and need to sort out some more japanese inspired projects and patterns for free.
I've also got back into Steampunk and have even started making Steampunk USB 8GB flash dives. I will post up some pictures soon as i'm going to be starting work on them soon.
I have also in the time gone by been sculpting, mould making and casting a small BJD and i'm very close to getting the point where i have a master that i'm going to send away to be cast.
I found a very interesting article through the Brass Goggles forum about precious metal clay and actually making the stuff. With a small amount of brass powder i have sitting around it is very tempting.
Friday, 22 May 2009
Recycle, be green and get great Items!
Mays' newsletter hit my inbox today from Doy bags.
If you don't know what Doy is then you are in for a treat!
http://www.doybags.com/index.html
They are a co-operative based in the Philippines and use recycled juice cartons and other items that would just be thrown away and turn them into desirable bags, belts, picture frames and more.
I initially found them after a bellydancing friend had a fantastic orange juice bag. I loved it so much i asked her where she got it and i then went online and bought my own bag in a different style but in red apple.
SO please check it out!
If you don't know what Doy is then you are in for a treat!
http://www.doybags.com/index.html
They are a co-operative based in the Philippines and use recycled juice cartons and other items that would just be thrown away and turn them into desirable bags, belts, picture frames and more.
I initially found them after a bellydancing friend had a fantastic orange juice bag. I loved it so much i asked her where she got it and i then went online and bought my own bag in a different style but in red apple.
SO please check it out!
Monday, 18 May 2009
Yayness
YAY my first items have now been listed on Etsy!
Just a couple of things to start with though, the clothing and other stuff will be coming later on.
For some reason it takes me ages to list items, maybe because i'm not used to it yet.
Ready to list are:
Pale blue gingham bar apron
a set of zakka owls
2 pairs of mini kokeshi
Just a couple of things to start with though, the clothing and other stuff will be coming later on.
For some reason it takes me ages to list items, maybe because i'm not used to it yet.
Ready to list are:
Pale blue gingham bar apron
a set of zakka owls
2 pairs of mini kokeshi
Monday, 11 May 2009


Wednesday, 6 May 2009
I was about to upload the pictures to the owl making tutorial and i remembered that i had seen another tutorial on Moonstitches Blog.
Moonstitches has done a better job than i ever could, so check it out here:
http://moonstitches.typepad.com/photos/tutowlrial/index.html
Moonstitches has done a better job than i ever could, so check it out here:
http://moonstitches.typepad.com/photos/tutowlrial/index.html
Monday, 27 April 2009
paper kokeshi

paper kokeshi
Originally uploaded by tigerluxe
I saw this on flickr while looking for designs to paint on some kokeshi and thought it was a lovely cross between a kokeshi and the washi no ningyo that i made a while ago from a japanese book.
It shouldn't be too difficult to make a cross between the two with the tecniques.
Saturday, 25 April 2009
Zakka Owls
I looked everywhere for a book mentioned in someone elses blog and couldn't get hold of one. So i decided to try making my own from the descriptions floating around the internet and some pictures as no one else seems to have posted any to try.
I'll upload in process photos tomorrow.
Photobucket pattern pieces scanned in at full size on a4 paper.
http://i95.photobucket.com/albums/l132/maggotgroves/owlpattern.jpg
You will need scraps of fabric for the tummies, outsides and base.
A bit of embroidery floss for a beak.
Two buttons for eyes.
Stuffing!!!
Cut one of each pattern piece out of contrasting fabric. Here i have used some navy wool scraps and some white synthetic felt.
Sew one side from a to b then pin the other side and sew from c to b.
Next sew up to the point from b to d, making sure that the stitching is strong if handsewing or go and oversew if using the machine.
Trim the seam allowances on the curves and close to the point d.
Turn the right way out, rolling the seams between your fingers to smooth out and make the point beak like...
Fold over the point gently and put a pin in place to make a rough face shape. Embroider 3 stitches for a beak and fasten off inside.
Draw around a 2p piece out of thick card and a circle of fabric with a 1 cm seam allowance for the base. This can be the main owl color or the contrast. gather the disc of fabric around the base and fasten off tightly.
Stuff the owl as firmly as you like and with a running stitch gather up the base to make a puffy little body.
Sew on the base with tiny stitches placing it centrally and holding it in place all the way round. Fasten off and put the needle through the body of the owl and snip to leave the end inside the body.
Sew on Buttons for eyes and then you're done!!!
Now make 2 more for a small line of your own little zakka owls.
Marvel at your handywork :D
I'll upload in process photos tomorrow.
Photobucket pattern pieces scanned in at full size on a4 paper.
http://i95.photobucket.com/albums/l132/maggotgroves/owlpattern.jpg
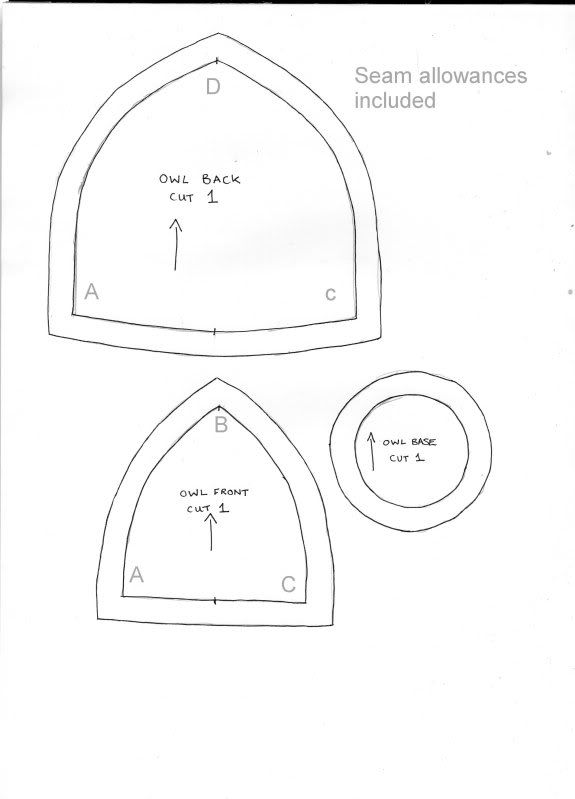
You will need scraps of fabric for the tummies, outsides and base.
A bit of embroidery floss for a beak.
Two buttons for eyes.
Stuffing!!!
Cut one of each pattern piece out of contrasting fabric. Here i have used some navy wool scraps and some white synthetic felt.
Sew one side from a to b then pin the other side and sew from c to b.
Next sew up to the point from b to d, making sure that the stitching is strong if handsewing or go and oversew if using the machine.
Trim the seam allowances on the curves and close to the point d.
Turn the right way out, rolling the seams between your fingers to smooth out and make the point beak like...
Fold over the point gently and put a pin in place to make a rough face shape. Embroider 3 stitches for a beak and fasten off inside.
Draw around a 2p piece out of thick card and a circle of fabric with a 1 cm seam allowance for the base. This can be the main owl color or the contrast. gather the disc of fabric around the base and fasten off tightly.
Stuff the owl as firmly as you like and with a running stitch gather up the base to make a puffy little body.
Sew on the base with tiny stitches placing it centrally and holding it in place all the way round. Fasten off and put the needle through the body of the owl and snip to leave the end inside the body.
Sew on Buttons for eyes and then you're done!!!
Now make 2 more for a small line of your own little zakka owls.
Marvel at your handywork :D
Friday, 24 April 2009
Recycling is easy for everyone.
I'm always on the look out on cheap ways to save money and recycle.
On an Etsy newsletter today it had a link to this blog:
http://transcanadaetsyteam.blogspot.com/2009/04/earth-day-preview-eco-friendly-products.html
Fantastic ideas to be green that couldn't be easier!
Now if only i could find a supplier for Eco-fi felt and recycled bubble wrap in the uk...
On an Etsy newsletter today it had a link to this blog:
http://transcanadaetsyteam.blogspot.com/2009/04/earth-day-preview-eco-friendly-products.html
Fantastic ideas to be green that couldn't be easier!
Now if only i could find a supplier for Eco-fi felt and recycled bubble wrap in the uk...
Tuesday, 21 April 2009
I'm working on transcribing an edwardian sewing book and a 1940's one and it's a little hard going so bear with me for those projects.
Also to come shortly are some small zakka projects that can be done by hand sewing, like pin cushions and other things.
There HAS to be some way to combine the two....*thinks*
Also to come shortly are some small zakka projects that can be done by hand sewing, like pin cushions and other things.
There HAS to be some way to combine the two....*thinks*
Saturday, 18 April 2009
Vintage Knitting
The first crafty post!!!!
YAY!
If anyone would like to make this and send me pictures then i'll post them up here.
Vintage 1940's Knitted Fez hat
This is a direct transcription so all terms are in 1940's weights and measures and needle size for the UK.
Materials:
2 oz 4 ply wool
1oz 2 ply wool for the scarf to trim
No.9 needles with points at both ends
Tension:
with double wool 5 1/2 stitches to 1"
Method
The fez is worked in double 4 ply wool, the scarf in 2 ply.
The Scarf:
Using the single 2 ply wool and 2 no.9 needles cast on 48 stitches.
1st row- *knit one, make one, knit 2 together; repeat from * to end
repeat this row until work measures 36 inches or length required. Cast off.
The Fez:
Using the double 4 ply wool and 4 no.9 needles, cast on 108 stitches. 36 stitches on each of 3 needles, work in rounds thus:-
1st round- * knit 2, purl 1; repeat from * to end.
2nd round- as the first round
3rd round- * purl 1, knit 1; repeat from * to end.
4th round- as third round
these 4 rounds form the pattern. continue in the pattern until 11th round has been completed.
12th round- * purl 3 together, pattern 33; repeat from * to end.
Continue in pattern for 7 more rounds.
20th round- * purl 3 together, pattern 31; repeat from * to end.
Continue in pattern for 7 more rounds.
Continue in this way Dec 2 stitches on each needle on every 8th round, until 78 stitches remain. Continue without shaping until work measures 6 inches. cast off.
Make up:
Turn the top edge of the fez onto the wrong side, making it deep enough to suit the wearer, and stitch lightly in position. Stitch one edge of the scarf along the lower edge of the fez for a few inches.
Then make a vertical loop about 1 1/2" long with buttonhole stitch or crochet chain, at the lower edge of the fez on the opposite side. Pass the 2 ends of the scarf through this loop, twist round in the opposite direction and tuck in.
YAY!
If anyone would like to make this and send me pictures then i'll post them up here.
Vintage 1940's Knitted Fez hat
This is a direct transcription so all terms are in 1940's weights and measures and needle size for the UK.
Materials:
2 oz 4 ply wool
1oz 2 ply wool for the scarf to trim
No.9 needles with points at both ends
Tension:
with double wool 5 1/2 stitches to 1"
Method
The fez is worked in double 4 ply wool, the scarf in 2 ply.
The Scarf:
Using the single 2 ply wool and 2 no.9 needles cast on 48 stitches.
1st row- *knit one, make one, knit 2 together; repeat from * to end
repeat this row until work measures 36 inches or length required. Cast off.
The Fez:
Using the double 4 ply wool and 4 no.9 needles, cast on 108 stitches. 36 stitches on each of 3 needles, work in rounds thus:-
1st round- * knit 2, purl 1; repeat from * to end.
2nd round- as the first round
3rd round- * purl 1, knit 1; repeat from * to end.
4th round- as third round
these 4 rounds form the pattern. continue in the pattern until 11th round has been completed.
12th round- * purl 3 together, pattern 33; repeat from * to end.
Continue in pattern for 7 more rounds.
20th round- * purl 3 together, pattern 31; repeat from * to end.
Continue in pattern for 7 more rounds.
Continue in this way Dec 2 stitches on each needle on every 8th round, until 78 stitches remain. Continue without shaping until work measures 6 inches. cast off.
Make up:
Turn the top edge of the fez onto the wrong side, making it deep enough to suit the wearer, and stitch lightly in position. Stitch one edge of the scarf along the lower edge of the fez for a few inches.
Then make a vertical loop about 1 1/2" long with buttonhole stitch or crochet chain, at the lower edge of the fez on the opposite side. Pass the 2 ends of the scarf through this loop, twist round in the opposite direction and tuck in.
Subscribe to:
Posts (Atom)